It's All About ORACLE

Oracle - The number one Database Management System. Hope this Blog will teach a lot about oracle.

Security - Managing Audit Trails

Relocate the audit trail to a different tablespace and set up an automatic purge process to keep its size under control.
One of the most significant aspects of database security involves setting up auditing to record user activities. The very knowledge that a user’s actions are being recorded can act as a significant deterrent to prevent wrongdoers from committing malicious acts.
When auditing is enabled, the audit output is recorded in an audit trail, which is usually stored in the database in a table under the SYS schema called AUD$. It can also reside as files in the file system, and the files can optionally be stored in XML format. For more-precise control, the Fine Grained Auditing feature of Oracle Database 11g provides granular control of what to audit, based on a more detailed set of policies. Fine Grained Auditing audits are usually stored in another table, FGA_LOG$, under the SYS schema.
These various audit trails can quickly grow out of control when database activity increases. As audit trails grow, two main challenges must be addressed: 
  1. Trails need to be kept to a manageable size (and old records purged) if they are to be used effectively in forensic analysis.
  2. Because database-resident trails are typically stored in the SYSTEM tablespace, they can potentially fill it up—bringing the database to a halt. 

Fortunately, the new auditing features in Oracle Database 11g Release 2 can help address these challenges. These capabilities, implemented in a package called DBMS_AUDIT_MGMT, enable you to move audit trails from the SYSTEM tablespace to one of your choice.
The new auditing features also let you set up one-time and automated purge processes for each of your audit trail types. Historically, to purge an audit trail, you were generally forced to stop auditing (which may have required bouncing the database), truncate, and then restart auditing (and bouncing the database again).
In this article, you will learn how to use the new features in Oracle Database 11g Release 2 to manage your audit trails. 

Relocating the Audit Trail Tables

Let’s first examine how to relocate an audit trail from the default SYSTEM tablespace to a new one. In case you don’t already have a suitable target tablespace, the code below shows how to create one: 

create tablespace audit_trail_ts
datafile '+DATA'
size 500M
segment space management auto
/
 
For moving an audit trail to the new tablespace, Oracle Database 11g Release 2 provides a procedure in DBMS_AUDIT_MGMT called SET_AUDIT_TRAIL_LOCATION. Listing 1 shows how to move a “standard” audit trail, which is the Oracle Database audit recorded in the AUD$ table.
Code Listing 1: Relocating a standard audit trail 
begin
 dbms_audit_mgmt.set_audit_trail_location(
  audit_trail_type            => dbms_audit_mgmt.audit_trail_aud_std,
  audit_trail_location_value  => 'AUDIT_TRAIL_TS');
end;
/
 
This move operation can be performed even when the database is up and an audit trail is being written. The target tablespace (AUDIT_TRAIL_TS in this case) must be available and online. If the tablespace is not available, auditing will stop, also stopping the database in the process. You should therefore be very careful about where you create the tablespace. The location should be permanent (and not on a temporary file system such as /tmp), and the underlying hardware should be resilient against failures (using RAID-1, for example).
The procedure can also be used for Fine Grained Auditing audit trails. To move a Fine Grained Auditing audit trail, simply replace the value of the audit_trail_type parameter in Listing 1 with dbms_audit_mgmt.audit_trail_fga_std. If you want to move both the standard and Fine Grained Auditing audit trails to the new tablespace, use the dbms_audit.audit_trail_db_std value as the audit_trail_type parameter. 

Purging Old Data

Next, let’s examine how to purge audit trails. The audit management package includes a procedure that automatically performs the purge for you. But before you can actually use it, you must call a one-time initialization procedure—INIT_CLEANUP—to set up the audit management infrastructure. Listing 2 shows how to perform the initialization. 

Code Listing 2: Initializing cleanup of audit entries 
begin
  dbms_audit_mgmt.init_cleanup(
    audit_trail_type            => dbms_audit_mgmt.audit_trail_db_std,
    default_cleanup_interval    => 24 );
end;
 
The INIT_CLEANUP procedure takes two parameters, neither of which takes a default value: 
  • audit_trail_type—designates the type of audit trail being initialized. For instance, audit_trail_aud_std indicates the standard database audit trail (the AUD$ table). Table 1 lists the possible values for this parameter and the audit trail types they represent.
  • default_cleanup_interval—designates the default interval in hours between executions of automatic purge jobs (to be discussed later in this article).

ParameterDescription
audit_trail_aud_stdThe standard AUD$ audit trail in the database
audit_trail_fga_stdThe FGA_LOG$ table, for Fine Grained Auditing
audit_trail_db_stdBoth standard and FGA audit trails
audit_trail_osThe OS audit trail
audit_trail_xmlThe XML audit trail
audit_trail_filesBoth OS and XML audit trails
audit_trail_allAll of the above
 Table 1: Types of audit trails for audit_trail_type

In addition to setting the default cleanup frequency, the INIT_CLEANUP procedure moves the audit trail out of the SYSTEM tablespace. If the FGA_LOG$ and AUD$ tables are in the SYSTEM tablespace, the procedure will move them to the SYSAUX tablespace. Needless to say, you should ensure that the SYSAUX tablespace has sufficient space to hold both of these tables. The process of moving data from one tablespace to the other can have an impact on performance, so you should avoid calling the procedure during peak hours.
If you have already relocated these two tables to another tablespace (as described in the previous section), they will stay in the new location and the procedure will execute much more quickly.
After calling the initialization procedure, you can perform the actual audit trail cleanup, but you likely wouldn’t just remove an audit trail blindly. In most cases, you would archive the trail first before performing a permanent purge. When doing so, you can call another procedure—SET_LAST_ARCHIVE_TIMESTAMP—to let the purge process know the time stamp up to which an audit trail has been archived. This procedure accepts three parameters: 
  • audit_trail_type—the type of audit trail you are about to purge.
  • last_archive_time—the last time the audit trail was archived for this type.
  • rac_instance_number—with an Oracle Real Application Clusters (Oracle RAC) database, OS audit trail files exist on more than one server. It’s possible to archive these files at different times, so this parameter tells the purge process the archive time of each node (or instance number) of the cluster. This parameter is applicable to Oracle RAC databases only; it has no significance for single-instance databases. Furthermore, this parameter is irrelevant for database audit trails, because they are common to all Oracle RAC instances. 

After you set the archive time stamp, you can check its value from a data dictionary view, DBA_AUDIT_MGMT_LAST_ARCH_TS. Listing 3 shows how to set the cutoff time stamp to September 30, 2009 at 10 a.m. and subsequently check its value from the view.
Code Listing 3: Setting the last archived time 
begin
   dbms_audit_mgmt.set_last_archive_timestamp(
     audit_trail_type  => dbms_audit_mgmt.audit_trail_aud_std,
     last_archive_time => 
        to_timestamp('2009-09-30 10:00:00','YYYY-MM-DD HH24:MI:SS'),
     rac_instance_number  => null
   );
end;
/

SQL> select * from DBA_AUDIT_MGMT_LAST_ARCH_TS;

AUDIT_TRAIL           RAC_INSTANCE
——————————————————————————————————
LAST_ARCHIVE_TS
——————————————————————————————————
STANDARD AUDIT TRAIL  0
30-SEP-09 10.00.00.000000 AM +00:00
 
Now you can execute the purge. To do so, run the code shown in Listing 4. The CLEAN_AUDIT_TRAIL procedure in the listing accepts two parameters. The first one is audit_trail_type. The second parameter—use_last_arch_timestamp—specifies whether the purge should be performed, depending on the last archive time stamp. If the parameter is set to TRUE (the default), the purge will delete the records generated before the time stamp (September 30, 2009 at 10 a.m. in this case). If it is set to FALSE, all audit trail records will be deleted.
Code Listing 4: Purging a standard database audit trail 
begin
  dbms_audit_mgmt.clean_audit_trail(
   audit_trail_type        =>  dbms_audit_mgmt.audit_trail_aud_std,
   use_last_arch_timestamp => TRUE
  );
end;
/
 
This same procedure is also used to purge file-based audit trails such as OS file audit trails and XML trails. To purge those trails, just specify the appropriate value for the audit_trail_type parameter (as shown in Table 1). However, note that for file-based audit trails, only the files in the current audit directory (as specified by the audit_file_dest initialization parameter) will be deleted. If you have audit trail files in a different directory from the one specified in audit_file_dest, those files will not be deleted.
Note that in Microsoft Windows, audit trails are entries in Windows Event Viewer and not actual OS files. So purging OS-based audit trails on that platform will not delete the trails. 

Setting Up Automatic Purge

The foregoing process is good for a one-time purge of audit trails. To ensure that audit trails do not overwhelm their tablespace, you may want to institute an automatic purge mechanism. The DBMS_AUDIT_MGMT package has another procedure—CREATE_PURGE_JOB—to do just that. This procedure takes four parameters: 

  • audit_trail_type—the type of the audit trail
  • audit_trail_purge_interval—the duration, in hours, between executions of the purge process
  • audit_trail_purge_name—the name you assign to this job
  • use_last_arch_timestamp—an indication of whether the job should delete audit trail records marked as archived. The default is TRUE. If the parameter is set to FALSE, the procedure will delete the entire trail. 

Listing 5 shows how to create a purge job that deletes standard audit trail records every 24 hours. As with one-time purges, you can create different jobs for each type of trail—such as standard, Fine Grained Auditing, OS files, and XML—simply by specifying different values for audit_trail_type when calling CREATE_PURGE_JOB. You can even set different purge intervals for each audit trail type to suit your archival needs. For instance, you can use a simple database-link-based script to pull database audit trail records to a different database while using a third-party tool to pull the OS audit trails. The execution time of each approach may be different, causing the database records to be pulled every day while the OS files are being pulled every hour. As a result, you might schedule purge jobs with an interval of 24 hours for database-based trails and with an interval of one hour for OS-file-based trails.
Code Listing 5: Creating a purge job for a standard audit trail 
begin
   dbms_audit_mgmt.create_purge_job (
   audit_trail_type            => dbms_audit_mgmt.audit_trail_aud_std,
   audit_trail_purge_interval  => 24,
   audit_trail_purge_name      => 'std_audit_trail_purge_job',
   use_last_arch_timestamp     => TRUE
   );
end;
/
 
You can view information about automatic purge jobs by accessing the DBA_AUDIT_MGMT_CLEANUP_JOBS data dictionary view. It shows all the important attributes of the job, such as the name, the type of audit trail being cleaned, and the frequency. 

Setting Audit Trail Properties

Next Steps

When setting up a purge job, you should always remember one very important fact. It performs a DELETE operation—not TRUNCATE—on database-based trails, so the purge operation generates redo and undo records, which may be quite significant, depending on the number of trail records deleted. A large deletion can potentially fill up the undo tablespace. To reduce the redo size of a transaction, the purge job deletes in batches of 1,000 and performs commits between them. If the database is very large, it may be able to handle much more redo easily. You can change the delete batch size by using the SET_AUDIT_TRAIL_PROPERTY procedure. Listing 6 shows how to set the delete batch size to 100,000. 

Code Listing 6: Setting the deletion batch size 
begin
 dbms_audit_mgmt.set_audit_trail_property(
  audit_trail_type            => dbms_audit_mgmt.audit_trail_aud_std,
  audit_trail_property        => dbms_audit_mgmt.db_delete_batch_size,
  audit_trail_property_value  => 100000);
end;
/
 
In addition to the db_delete_batch_size property referenced in Listing 6, you can use SET_AUDIT_TRAIL_PROPERTY to set several other important properties. They include the following: 
  • file_delete_batch_size specifies how many OS audit trail files will be deleted by the purge job in one batch.
  • cleanup_interval specifies the default interval, in hours, between executions of a purge job.
  • os_file_max_age specifies how many days an OS file or an XML file can be left open before a new file is created.
  • os_file_max_size specifies the maximum size of an audit trail file (in kilobytes). 

To find the current value of a property, you can check the data dictionary view DBA_AUDIT_MGMT_CONFIG_PARAMS. 
Conclusion

Audit trails establish accountability. In Oracle Database 11g, there are several types of audit trails—standard, fine-grained, OS-file-based, and XML. In this article, you learned how to relocate a database-based audit trail from its default tablespace—SYSTEM—to another one designated only for audit trails. You also learned how to purge audit trails of various types to keep them within a manageable limit, and you finished by establishing an automatic purge process.
Informatica PowerC Installation and Configuration Complete Gide

This article provides complete step by step instruction for installation and configuration of Informatica PowerCenter 9.x. This includes  the installation of server components, configuration of different Informatica services and client installation and configuration.
        • Download Installation Pack.
        • Unpack the Installation Package.
        • Install Informatica PowerCenter Server.
        • Domain Configure.
        • Configure Repository Service.
        • Configure Integration Service.
        • Client Installation.

Download Installation Pack

Step : 1
Informatica PowerCenter trail version can be downloaded from https://edelivery.oracle.com
Log on to https://edelivery.oracle.com and accept the Terms and Conditions.

Step : 2
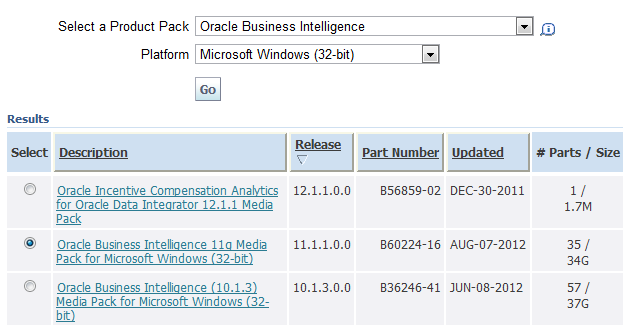
Choose the Product package as shown below and Click Continue.

Informatica PowerCenter 9 Download

Step : 3
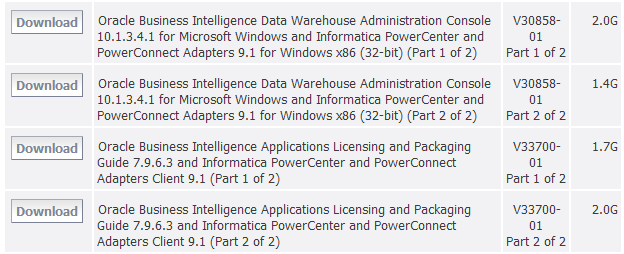
Locate the download package as shown in below image.

Informatica PowerCenter 9 Download

Step : 4
Download the packages to D:\INFA9X

Informatica PowerCenter 9 Download

Unpack the Installation Package

Step : 1
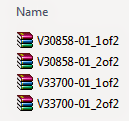
Unzip all the the four downloaded zip files into D:\INFA9X. Hint : Use the program WinRAR to unzip all the files. After unzipping you will see below files and folders.

Informatica PowerCenter 9 UnZip

Step : 2
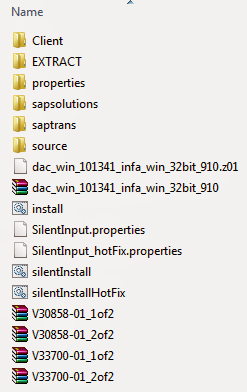
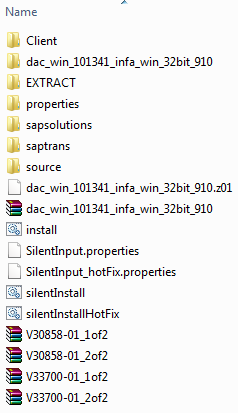
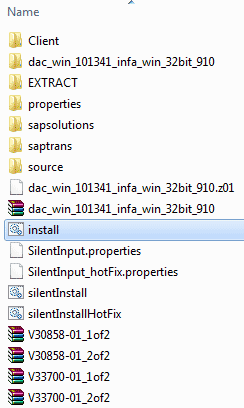
Unzip dac_win_101314_infa_win_32bit_910.zip into the the same folder D:\INFA9X. After unzipping you will see below files and folders.

Informatica PowerCenter 9 UnZip

Install Informatica PowerCenter Server

Step : 1
To locate install.exe, Navigate to D:\INFA9X\dac_win_101314_infa_win_32bit_910 as shown in below image. double click on the install.exe.

Informatica 9 Installation Steps

Step : 2
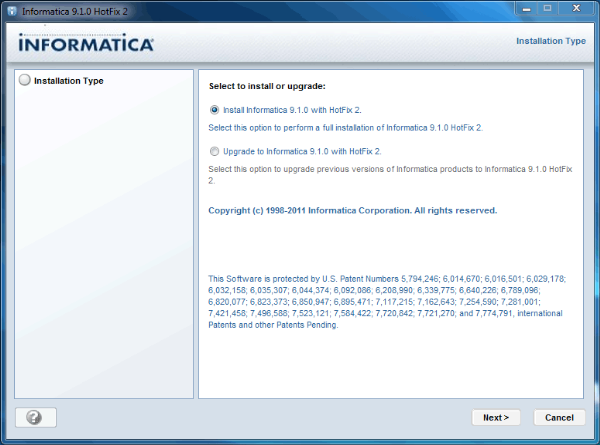
Installation wizard Starts.  Choose the installation type.
Click Next.

Informatica 9 Installation Steps

Step : 3
Installation Pre-requisites will be shown before the installation starts as below.
Click Next.

Informatica 9 Installation Steps

Step : 4
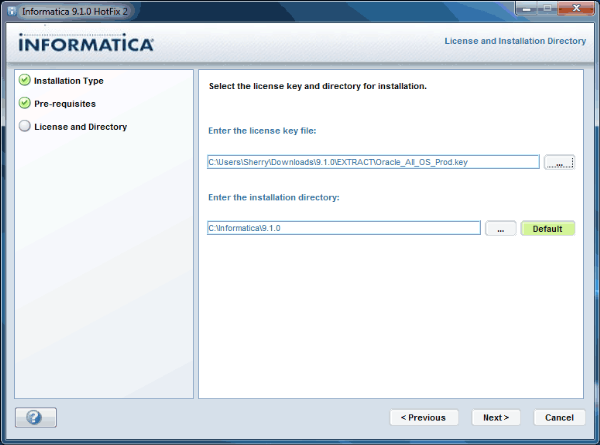
Enter the license key. You can locate the license key from D:\INFA9X\EXTRACT\Oracle_All_OS_Prod.key.
Click Next.

Informatica 9 Installation Steps

Step : 5
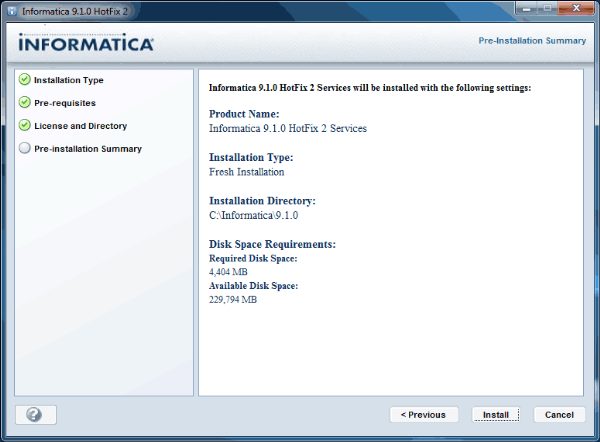
Pre-installation summery will give the items installed during the installation process based on the license key.
Click Next

Informatica 9 Installation Steps

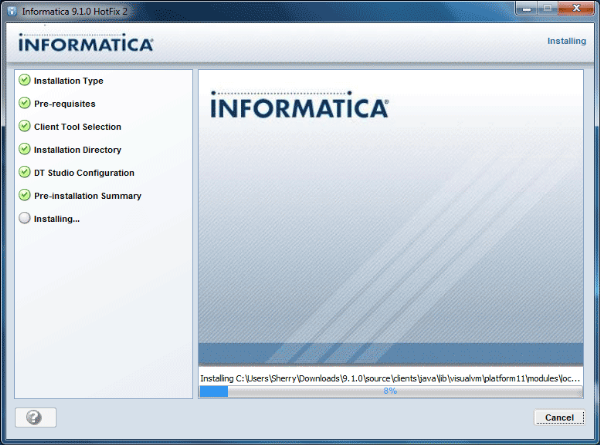
Step : 6
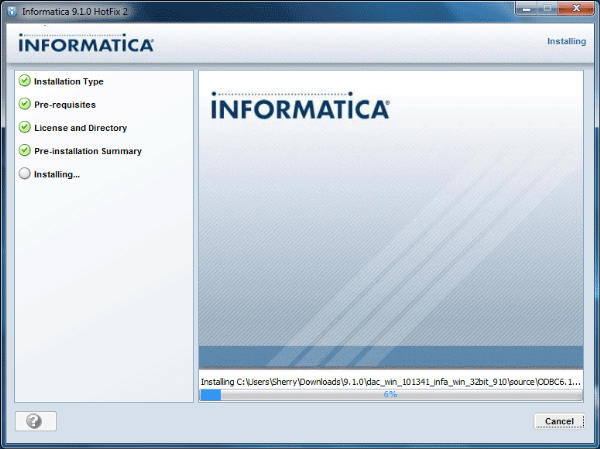
Installation Begins. It takes couple of minutes to finish. Soon after completion of this step, Configuring Domain window opens. Continue the steps from Domain Configuration.

Informatica 9 Installation Steps

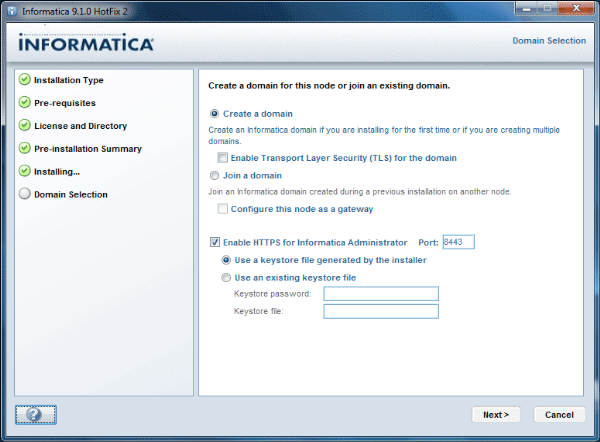
Domain Configuration.

Step : 1
    • Choose “Create a Domain” radio button.
    • Check “Enable HTTPS for Informatica Administrator”
    • Leave the Port number as it is and choose “Use a keystore file generated by the installer”
Click Next.

Informatica 9 Installation Steps

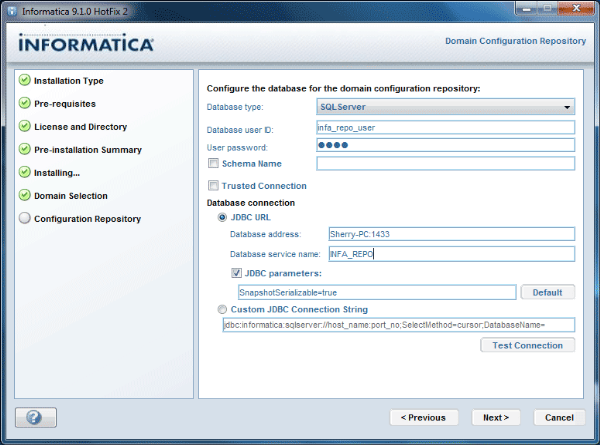
Step : 2
Provide the Repository database details as below.
    • Database Type : Choose your Repository database (Oracle/SQL Server/Sybase)
    • Database user ID : Database user ID to connect database.
    • User Password  : Password.
    • Schema Name : If Schema name is not provided default schema will be used.
    • Database Address and Port : Machine on which database in installed and default port number.
    • Database Service Name :  Database Name.
Below image shows the configuration using SQL Server.
Click Next.

Informatica 9 Installation Steps

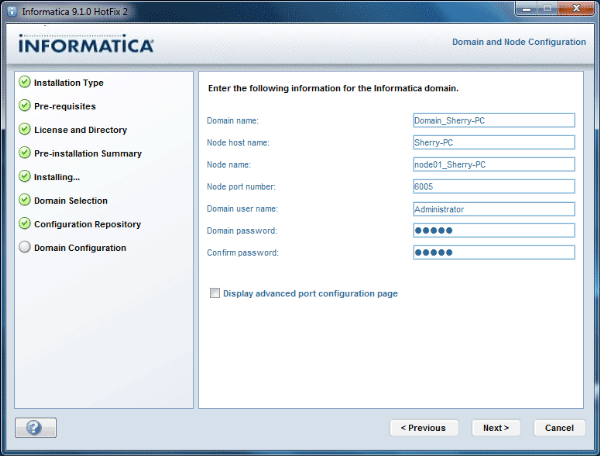
Step : 3
You can give the Domain details, Admin user details now.
    • Domain Name : Name of your Domain.
    • Node Host Name : Machine name on which Informatica Server is running.
    • Node Name : Name of the Node.
    • Node Port Number : Leave the default port Number.
    • Domain user name : This is the Administrator user
    • Domain password : Administrator password
Note : Remember your Admin User ID, Password to log on to Admin Console later in the installation.

Informatica 9 Installation Steps

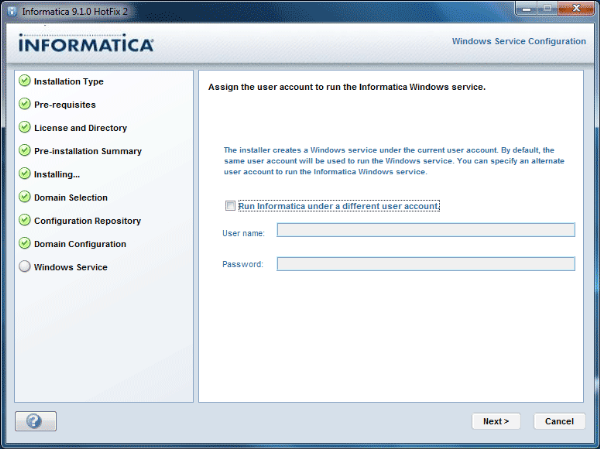
Step : 4
Use the default configuration and Click Next.

Informatica 9 Installation Steps

Step : 5
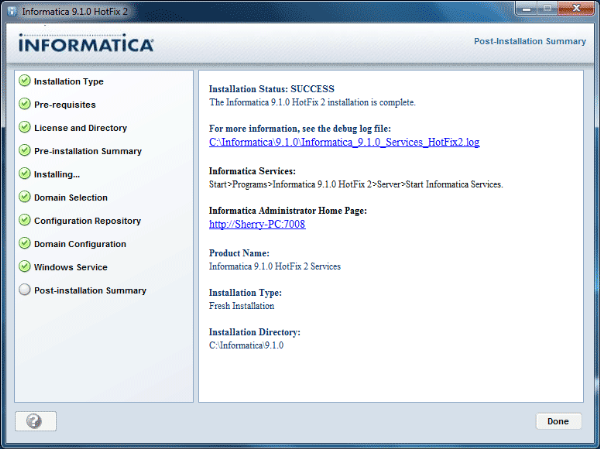
Installation is complete and you get the post-installation summery. You get a link to the installation log file and a link to Admin console.
Click Done.

Informatica 9 Installation Steps

Configure Repository Service

Step : 1
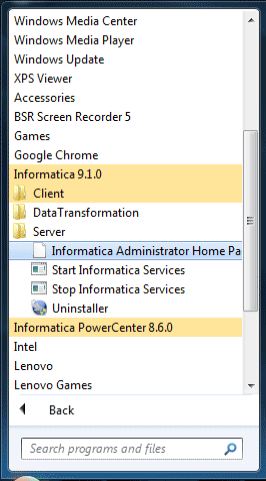
Go to Start menu and Click on “Informatica Administrator Home Page”. This will open up the Admin Console in a web browser.

Informatica 9 Installation Steps

Step : 2
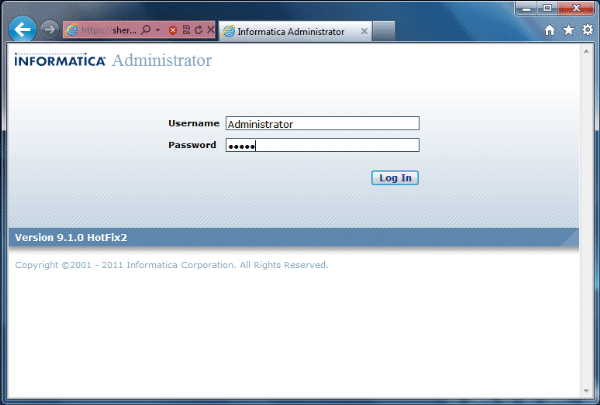
Log on to Admin console using your Admin User ID and Password. You set your Admin User ID and Password in “Domain Configuration” section Step 3

Informatica 9 Installation Steps 

Step : 3
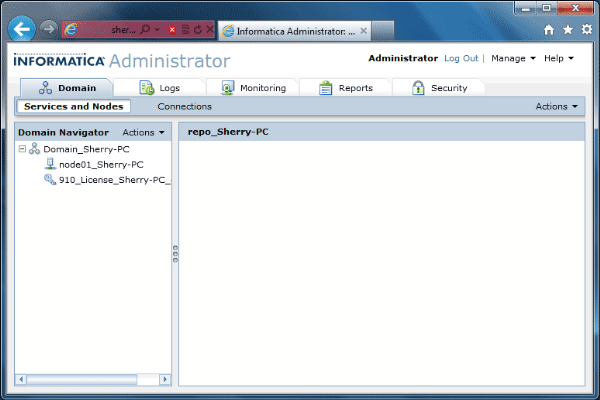
Once you Log on you will see the Screen just like shown below.

Informatica 9 Installation Steps

Step : 4
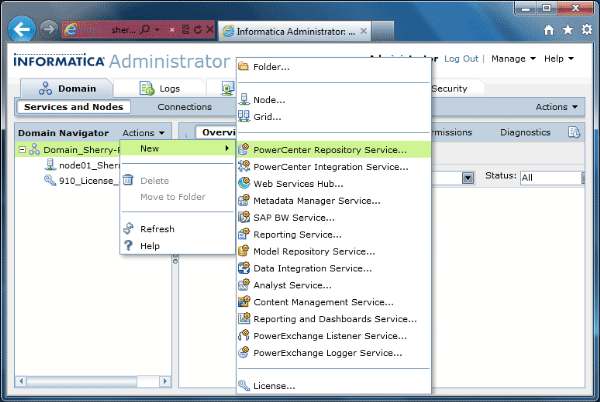
Choose your Domain Name from “Domain Navigator”, Click on “Actions”, Choose “New” and “PowerCenter Repository Service”.

Informatica 9 Installation Steps

Step : 5
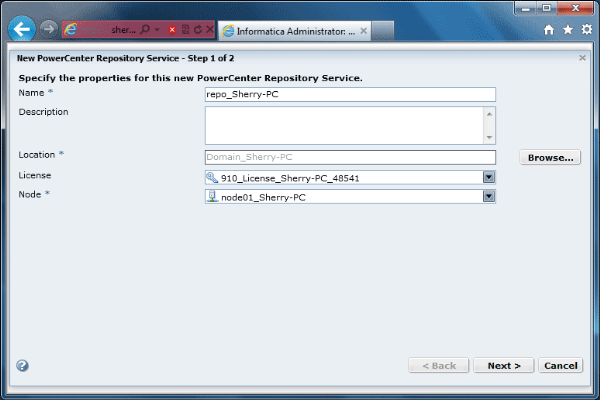
A new screen will appear, Provide the details as shown below.
    • Repository Name : Your Repository Name.
    • Description :  An optional description about the repository.
    • Location : Choose the Domain you have already created. If you have only one Domain, this value will be pre populated.
    • License : Choose the license key from the drop down list.
    • Node : Choose the node name from the drop down list.
Click Next.

Informatica 9 Installation Steps

Step : 6
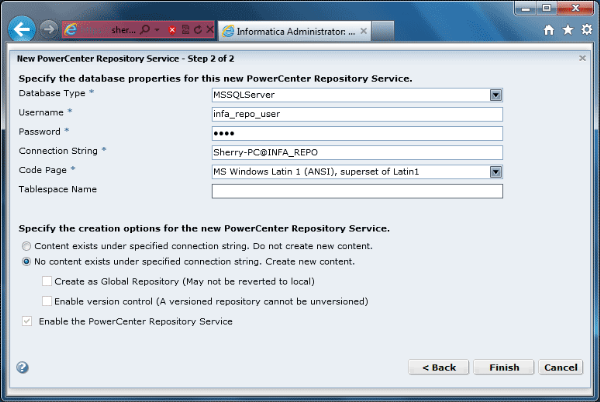
A new screen will appear, Provide the Repository database details.
    • Database Type : Choose your Repository database (Oracle/SQL Server/Sybase)
    • Username : Database user ID to connect database.
    • Password : Database user Password.
    • Connection String : Database Connection String.
    • Code Page : Database Code Page
    • Table Space : Database Table Space Name
    • Choose “No content exists under specified connection string. Create new content”
Click Finish

Informatica 9 Installation Steps

Step : 7
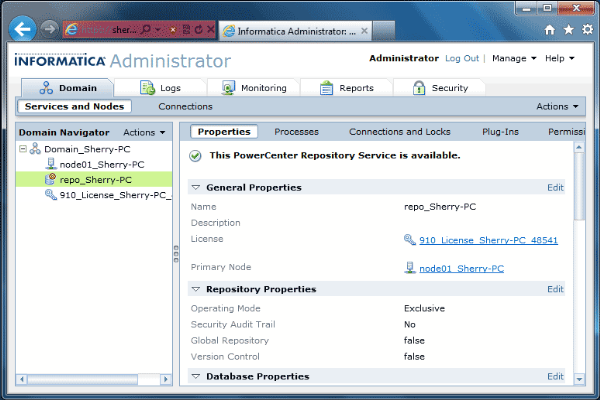
It takes couple of minutes create Repository content. After the repository creation below screen will be seen.

Informatica 9 Installation Steps

Step : 8
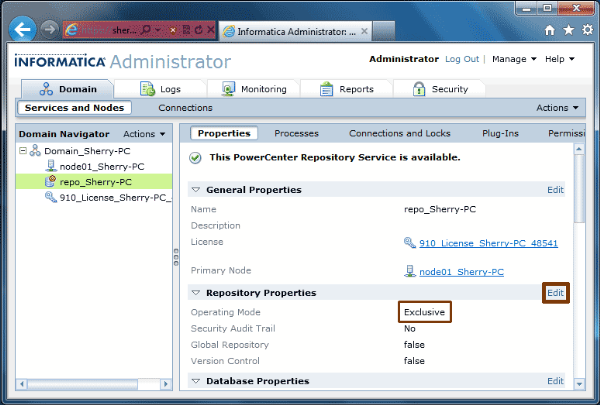
The repository service will be running in “Exclusive” mode as shown below. This needs to be change to “Normal” before we can configure Integration service.
Click “Edit” Repository Properties.

Informatica 9 Installation Steps

Step : 9
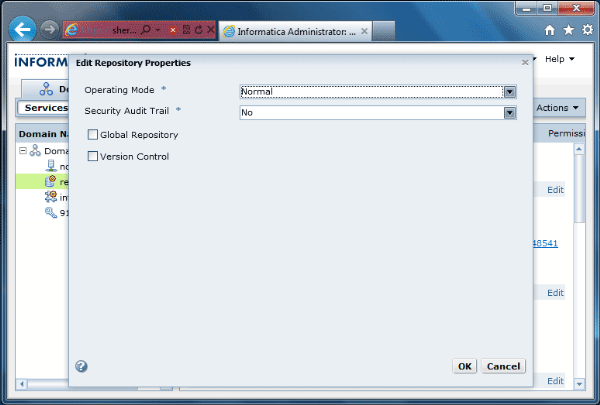
A pop up window appears, Set the properties
    • Operation Mode : Normal
    • Security Audit Trail : No
Click OK.

Click OK for the next two pop up windows which confirms the Repository Restart to change the Repository Operating Mode.

Informatica 9 Installation Steps

Configure Integration Service

Step : 1
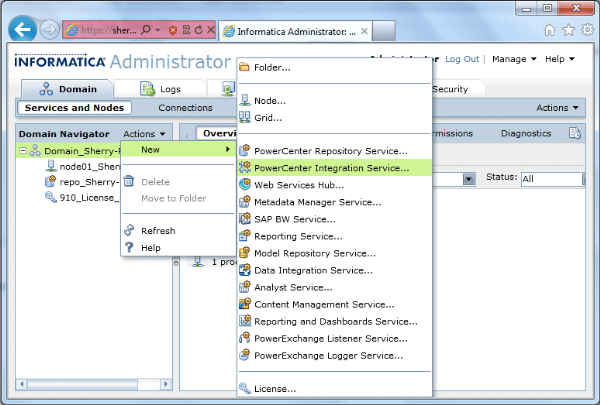
Choose your Domain Name from “Domain Navigator”, Click on “Actions”, Choose “New” and “PowerCenter Integration Service”.

Informatica 9 Installation Steps

Step : 2
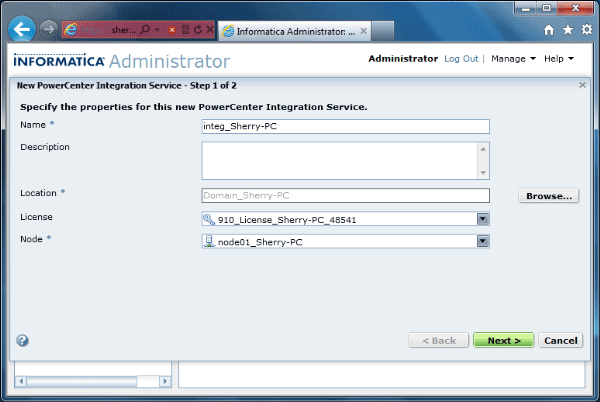
A new window will appear, Provide the details as shown below.
    • Name : Your Integration Service Name.
    • Description :  An optional description about the repository.
    • Location : Choose the Domain you have already created. If you have only one Domain, this value will be pre populated.
    • License : Choose the license key from the drop down list.
    • Node : Choose the node name from the drop down list.
Click Next.

Informatica 9 Installation Steps

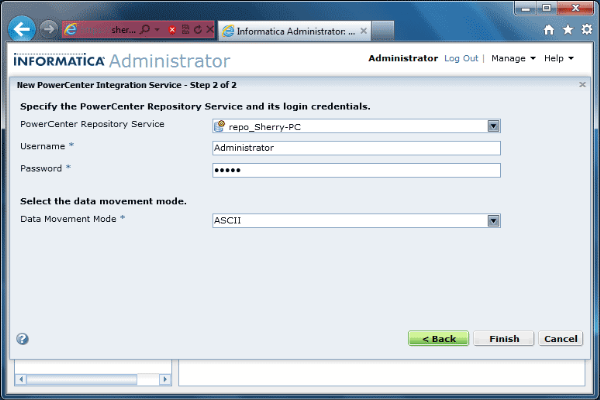
Step : 3
A new window will appear, Provide the details as shown below.
    • PowerCenter Repository Service : Choose your Repository Service Name from the drop down list.
    • Username :  Admin user name.
    • Password : Admin password.
    • Data Movement Mode : ASCII.
Click Finish.

Informatica 9 Installation Steps

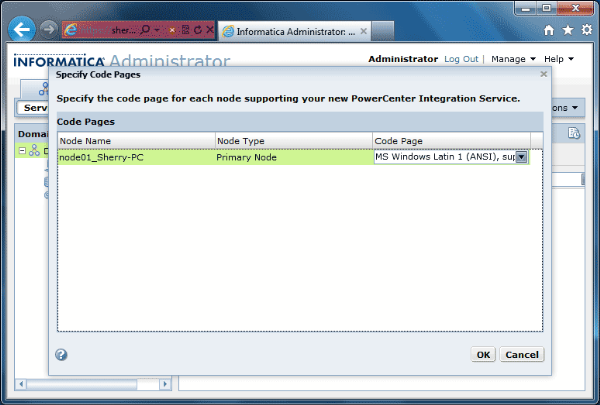
Step : 4
A pop up window will appear, Choose the Code Page as ANSI.
Click OK.

Informatica 9 Installation Steps

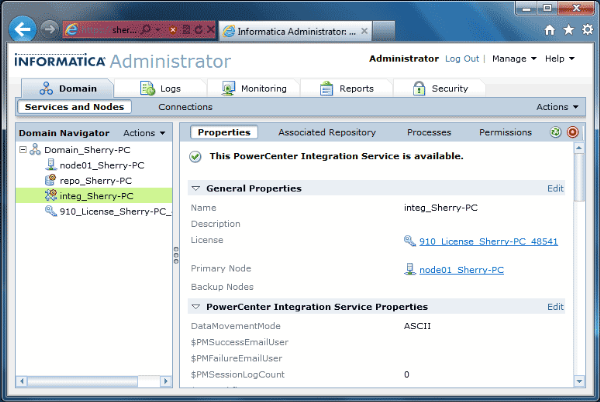
Step : 5
Window will be closed and you can see all the configured services in the “Domain Navigator”

Informatica 9 Installation Steps

With that we are all done with the installation and configuration for Informatica PowerCenter Server.

Client Installation.

Step : 1
Go to D:\INFA9X  as shown in below image. Click on the install.bat.

Informatica 9 Installation Steps

Step : 2
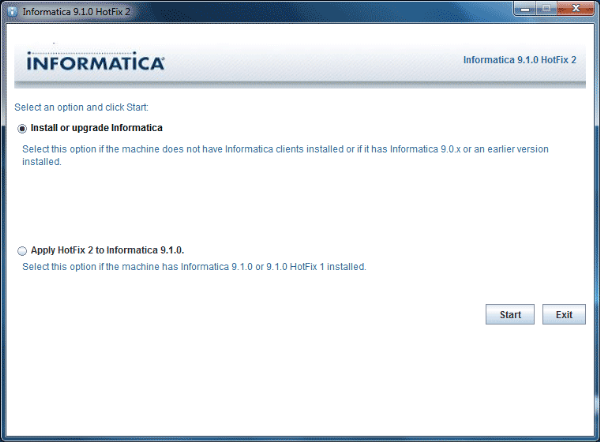
Installation wizard Starts.
Click Start.

Informatica 9 Installation Steps

Step : 3
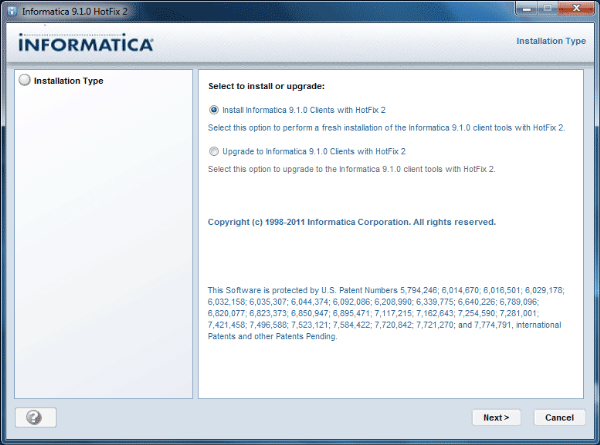
Installation wizard Starts.  Choose the installation type as in the below image.
Click Next.

Informatica 9 Installation Steps

Step : 4
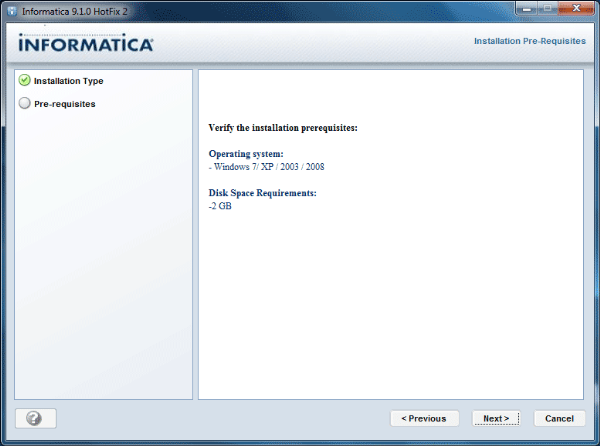
Installation Pre-requisites will be shown before the installation starts as below.
Click Next.

Informatica 9 Installation Steps

Step : 5
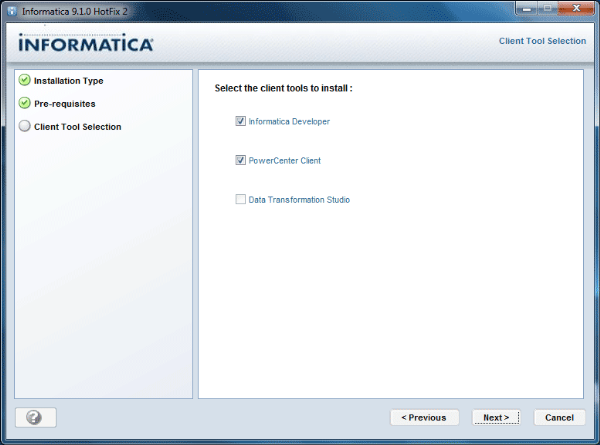
Choose the client tools you need. Only PowerCenter  Client is mandatory.
Click Next.

Informatica 9 Installation Steps

Step : 6
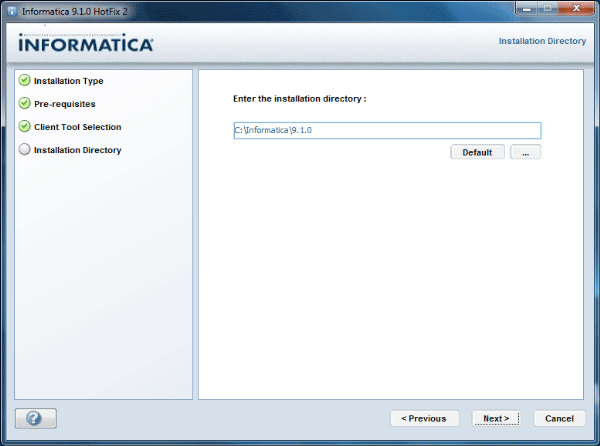
Choose the client installation directory.
Click Next.

Informatica 9 Installation Steps
Step : 7
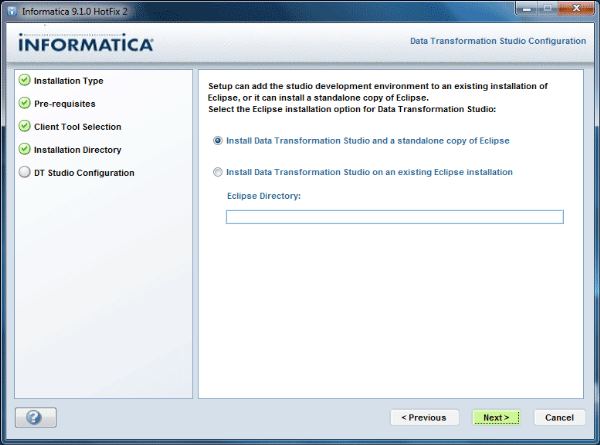
You can choose the type of Eclipse installation in this step. This window will be available if you choose to install “Informatica Developer” or “Data Transformation Studio”.
Click Next.

Informatica 9 Installation Steps

Step : 8
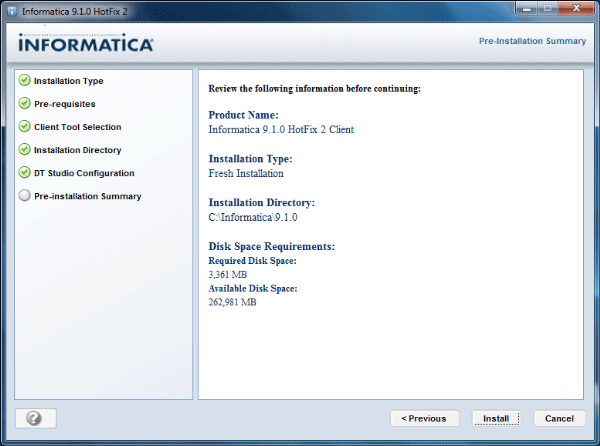
Pre-installation summery will give the items installed during the installation process.
Click Next.

Informatica 9 Installation Steps
Step : 9
Installation Begins. It takes one or two minutes to complete this step.

Informatica 9 Installation Steps

Step : 10
Installation is complete and you get the post-installation summery.

Informatica 9 Installation Steps

With that we are all done with the installation and configuration for Informatica PowerCenter Client.

Hope you enjoy this tutorial, Please let us know if you have any difficulties during your installation process, we will be more than happy to help you.

Oracle User Password Security

About User Security

Each Oracle database has a list of valid database users. To access a database, a user must run a database application, and connect to the database instance using a valid user name defined in the database. Oracle Database enables you to set up security for your users in a variety of ways. When you create user accounts, you can specify limits to the user account. You can also set limits on the amount of various system resources available to each user as part of the security domain of that user. Oracle Database provides a set of database views that you can query to find information such as resource and session information.

Profile

 A profile is collection of attributes that apply to a user. It enables a single point of reference for any of multiple users that share those exact attributes.

Default Oracle Passwords

By default Oracle creates a number of schemas, each with a default password. Although many of these users are locked, it is still good practice to switch to non-default passwords in case they are unlocked by mistake. In addition, regular users often switch their passwords to match their username. Both of these situations represent a security risk

Password Management

The Oracle database includes a range of functionilty to help secure database users. Unused accounts should be locked, while accounts that are used intermittantly should be unlocked as needed.

ALTER USER scott ACCOUNT UNLOCK;

-- Use the schema.

ALTER USER scott ACCOUNT LOCK;
 

Creating Profile
Password aging, expiration and history is managed via profiles, as shown below. 
 
CONN sys/password AS SYSDBA

CREATE PROFILE my_profile LIMIT
  FAILED_LOGIN_ATTEMPTS 3  -- Account locked after 3 failed logins.
  PASSWORD_LOCK_TIME 5     -- Number of days account is locked for. UNLIMITED required explicit unlock by DBA.
  PASSWORD_LIFE_TIME 30    -- Password expires after 90 days.
  PASSWORD_GRACE_TIME 3    -- Grace period for password expiration.
  PASSWORD_REUSE_TIME 120  -- Number of days until a specific password can be reused. UNLIMITED means never.
  PASSWORD_REUSE_MAX 10    -- The number of changes required before a password can be reused. UNLIMITED means never.
/

ALTER USER scott PROFILE my_profile; 
 
The PASSWORD_REUSE_TIME and PASSWORD_REUSE_MAX parameters work in conjunction, so if either is set to unlimited password reuse is prevented.

 PASSWORD_VERIFY_FUNCTION
Password complexity is enforced using a verification function. This must accept three parameters (username, password and old_password) and return a boolean value, where the value TRUE signifies the password is valid. The example below forces the password to be at least 8 characters long.

CREATE OR REPLACE FUNCTION my_varification_function (
  username      VARCHAR2,
  password      VARCHAR2,
  old_password  VARCHAR2)
  RETURN BOOLEAN AS
BEGIN
  IF LENGTH(password) < 8 THEN
    RETURN FALSE;
  ELSE
    RETURN TRUE;
  END IF;
END my_varification_function;
/
 
Once the function is compiled under the SYS schema it can be referenced by the PASSWORD_VERIFY_FUNCTION parameter of a profile.
ALTER PROFILE my_profile LIMIT
  PASSWORD_VERIFY_FUNCTION my_varification_function;
 
The code below assigns the completed profile to a user and tests it.
SQL> ALTER USER scott PROFILE my_profile;

User altered.

SQL> ALTER USER scott IDENTIFIED BY small;
ALTER USER scott IDENTIFIED BY small
*
ERROR at line 1:
ORA-28003: password verification for the specified password failed


SQL> ALTER USER scott IDENTIFIED BY much_bigger;

User altered.

SQL>

 Revoke Unnecessary Privileges

As a rule of thumb, you should grant users the smallest number of privileges necessary to do their job.

REVOKE CREATE DATABASE LINK FROM connect;
REVOKE EXECUTE ON utl_tcp FROM public;
REVOKE EXECUTE ON utl_smtp FROM public;
REVOKE EXECUTE ON utl_http FROM public;
REVOKE EXECUTE ON utl_mail FROM public;
REVOKE EXECUTE ON utl_inaddr FROM public;
REVOKE EXECUTE ON utl_file FROM public;
REVOKE EXECUTE ON dbms_java FROm public;
 

Securing the Listener
In versions prior to 10g Release 1, the TNS listener should be password protected using the lsnrctl utility or the netmgr GUI. When using the lsnrctl utility, the change_password command is used to set the password for the first time, or to change an existing password.

LSNRCTL> change_password
Old password:
New password:
Reenter new password:
Connecting to (DESCRIPTION=(ADDRESS=(PROTOCOL=TCP)(HOST=myserver.mydomain)(PORT=1521)))
Password changed for LISTENER
The command completed successfully
LSNRCTL>
 
The "Old password:" value should be left blank if the password is being set for the first time. Once the new password is set, the configuration 
should be saved using the save_config command. 

LSNRCTL> save_config
Connecting to (DESCRIPTION=(ADDRESS=(PROTOCOL=TCP)(HOST=myserver.mydomain)(PORT=1521)))
Saved LISTENER configuration parameters.
Listener Parameter File   /u01/app/oracle/product/10.1.0/db_1/network/admin/listener.ora
Old Parameter File   /u01/app/oracle/product/10.1.0/db_1/network/admin/listener.bak
The command completed successfully
LSNRCTL>
 
Once the password is set, subsequent attempts to perform privileged operations such as save_config and stop will fail unless the password is set using the set password command.
LSNRCTL> set password
Password:
The command completed successfully
LSNRCTL>


Authorisation failure with CRS

A while back I had the problem that my CRS information was lost.

Now I had found that when I did a crs_start of the component I received the following error:

CRS-0254 authorization failure

Some investigation showed that the problem was related to the fact that the component was not owned by the oracle user.

Using crs_getperm ora.ORCL.db showed the problem.

oracle@myhost:/opt/oracle/crs/bin>./crs_getperm ora.ORCL.db
Name: ora.ORCL.db
owner:root:rwx,pgrp:system:r-x,other::r--,

This can be solved by doing the following:

crs_setperm ora.ORCL.db -o oracle
crs_setperm ora.ORCL.db -g dba

Now it works again.

Oracle listener lsnrctl tips

Here we see the lsnrctl command in action:
$ lsnrctl
LSNRCTL for Solaris: Version 9.2.0.1.0 - Production on 30-JAN-2003 11:54:13
(c) Copyright 1998 Oracle Corporation.  All rights reserved.
Welcome to LSNRCTL, type "help" for information.
LSNRCTL> help

The following lsnrctl operations are available
An asterisk (*) denotes a modifier or extended command:
start               stop                status
services            version             reload
save_config         trace               spawn
dbsnmp_start        dbsnmp_stop         dbsnmp_status
change_password     quit                exit
set*                show*


The following commands are used to manage the listener: 
·     start – Starts the listener with the name specified, otherwise LISTENER will be used.  For Windows systems, the listener can also be started from the Control Panel.
·     stop – Stops the listener.  For Windows systems, the listener can also be stopped from the Control Panel.
·     status – Provides status information about the listener, including start date, uptime, and trace level.
·     services – Displays each service available, along with the connection history.
·     version – Displays the version information of the listener.
·     reload – Forces a read of the configuration file in order for new settings to take effect without stopping and starting the listener.
·     save_config – Creates a backup of the existing listener.ora file and saves changes to the current version.
·     trace – Sets the trace level to one of the following – OFF, USER, ADMIN, or SUPPORT.
·     spawn – Spawns a program that runs with an alias in the listener.ora file.
·     dbsnmp_start – Starts the DBSNMP subagent. 
 ·     dbsnmp_stop – Stops the DBSNMP subagent.
·     dbsnmp_status – Displays the status of the DBSNMP subagent.
·     change_password – Sets a new password for the listener.
·     quit and exit – Exits the utility.
·     set – Changes the value of any parameter.  Everything that can be shown can be set.
show – Displays current parameter settings.


You Might Also Like

Related Posts with Thumbnails

Pages